Unlock the Secret to Perfect Hard-Boiled Eggs: Timing is Everything
Hard-boiled eggs are a true kitchen workhorse. From a quick, protein-packed breakfast to the foundation of beloved dishes like deviled eggs, egg salad, and potato salad, their versatility is unmatched. Yet, despite their apparent simplicity, achieving that ideal texture – bright, creamy yolks without a hint of rubberiness or the dreaded gray ring – often feels like a culinary mystery. Many wonder how to make perfect hard boiled eggs consistently. The good news? It’s not magic; it’s all about mastering the timing and a simple stovetop technique.
Forget overcooked, chalky yolks or stubborn shells. This comprehensive guide will demystify the process, empowering you to create hard-boiled eggs exactly to your preference, from delicately runny to satisfyingly firm. We'll dive deep into the foolproof stovetop method, precise timing for every yolk consistency, and invaluable tips to ensure easy peeling and vibrant results every time.
The Foolproof Stovetop Method: Cold Start, Perfect Finish
While various gadgets promise perfection, the stovetop method remains the most reliable and accessible way to make perfect hard boiled eggs. The secret lies not just in boiling, but in a clever manipulation of temperature that ensures evenly cooked whites and prevents that unappealing gray-green ring around the yolk.
Here’s the step-by-step breakdown:
- Start Cold: Place your eggs in a single layer at the bottom of a saucepan. Crucially, add enough cold water to cover the eggs by about an inch. Starting with cold water is vital because it allows the eggs to heat up gradually, preventing the whites from becoming rubbery. This gentle warming also gives air inside the egg time to escape slowly through the shell's pores, significantly reducing the chances of cracking.
- Bring to a Rapid Boil: Place the saucepan over high heat. Bring the water to a rapid, rolling boil. You'll see the eggs "dancing" slightly in the bubbling water.
- Remove from Heat and Cover: As soon as the water reaches a full boil, immediately turn off the heat. Cover the pot tightly with a lid. This is where the magic happens! The residual heat in the water will continue to cook the eggs gently and evenly, without the harsh, direct heat that often leads to overcooked whites and gray yolks.
- Let Stand (The Timing Game Begins!): This is the most critical step, determining your yolk's final texture. Let the eggs stand in the hot, covered water for a specific duration. We'll detail these timings below.
- Ice Bath Immediately: Once your desired cooking time is up, use a slotted spoon to transfer the eggs directly into an ice bath (a bowl of ice water). This crucial step immediately halts the cooking process, preventing overcooking and making the eggs much easier to peel. Allow them to cool in the ice bath for at least 5-10 minutes before peeling or refrigerating.
This simple yet effective technique ensures bright, creamy yolks and tender whites, allowing you to Master Perfect Hard-Boiled Eggs: Our Foolproof Stovetop Guide with confidence.
Master the Timing: Your Guide to Yolk Perfection
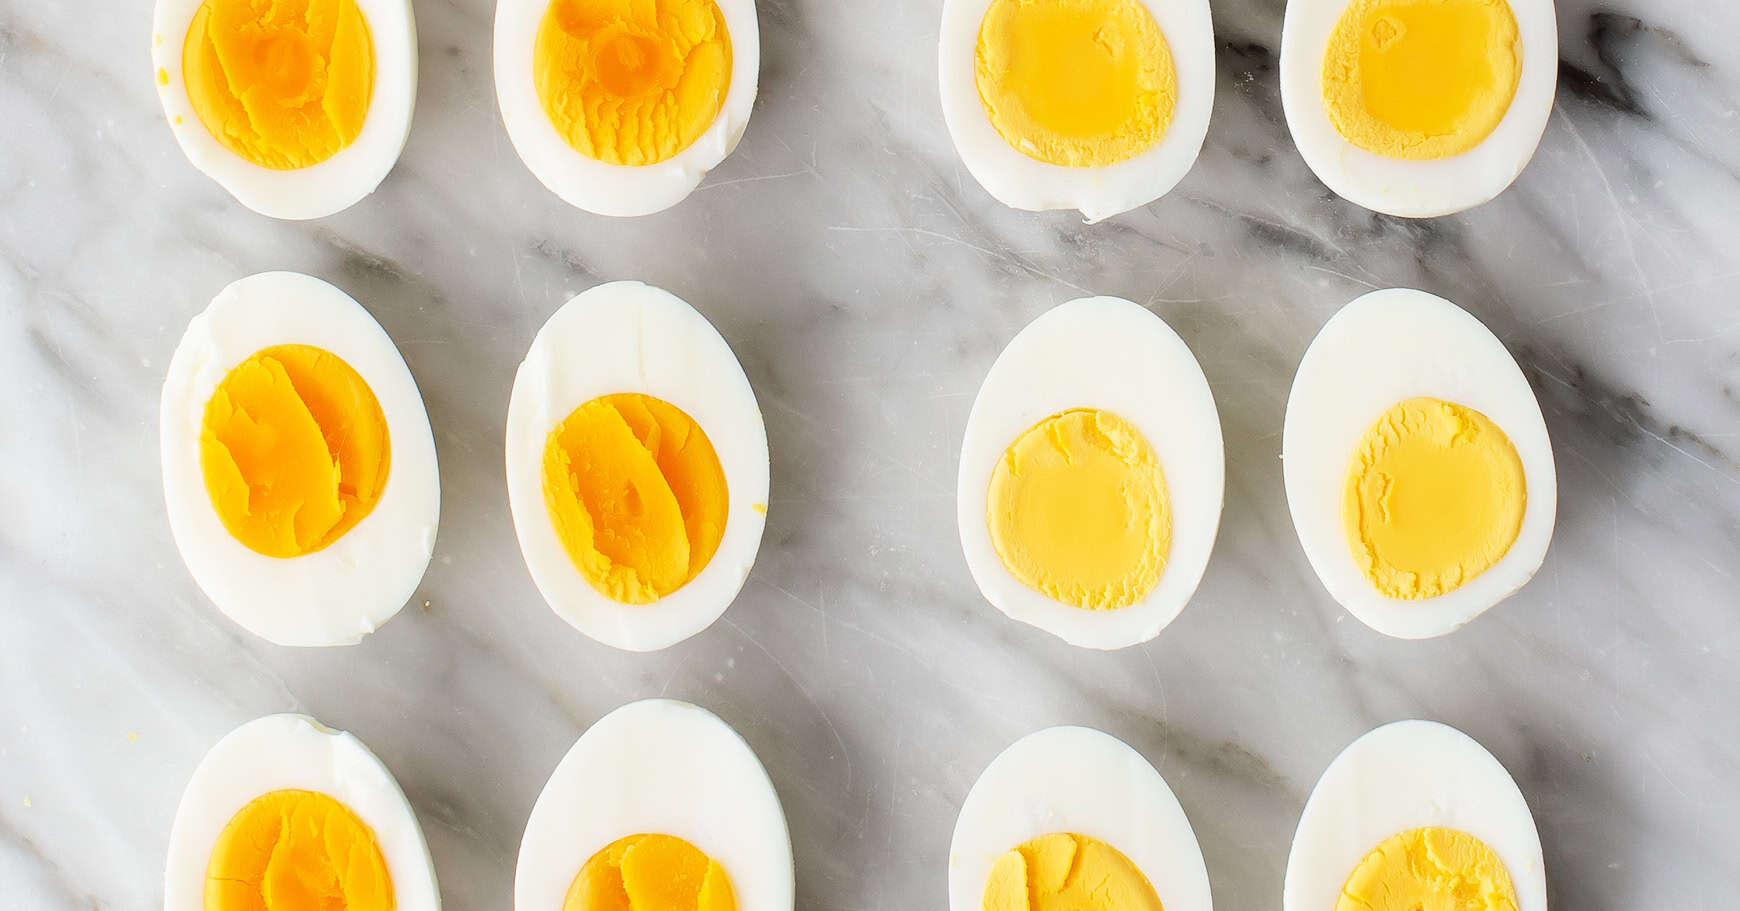
The beauty of this stovetop method is its precision. By adjusting the "stand time" in the hot water, you can achieve a spectrum of yolk consistencies, from delightfully gooey to perfectly firm. These timings are based on large eggs cooked at sea level, so be prepared to make slight adjustments for extra-large or small eggs, or if you live at a high elevation (where boiling times often need to be extended).
- 6 Minutes: Soft-Boiled Eggs (Runny & Silky)
For a truly luxurious experience, six minutes yields a yolk that is still wonderfully runny and almost custard-like. The whites will be just set but still very tender. Perfect for drizzling over toast, instant ramen, or elevating a simple grain bowl. - 9 Minutes: Medium-Boiled Eggs (Jammy & Gel-like)
This is arguably the most coveted consistency for many – the "jammy" egg. After nine minutes, the yolk will be mostly set but still beautifully soft and gel-like in the center, with a rich, vibrant orange hue. Ideal for adding richness to salads, avocado toast, or as a sophisticated snack. - 12 Minutes: Firm-Boiled Eggs (Set but Slightly Soft)
At twelve minutes, your yolks will be firm and fully cooked around the edges, but still possess a delightful touch of softness and creaminess right in the very center. This is a great sweet spot for those who want a set yolk without any dryness, working well in chopped salads or as a satisfying snack. - 15-17 Minutes: Hard-Boiled Eggs (Fully Hardened & Creamy)
To achieve a classic, fully hardened hard-boiled egg yolk, aim for 15 minutes. For an absolutely firm, creamy yolk (as favored by some chefs), extend to 17 minutes. The yolks will be bright yellow, cooked through, and free of any chalkiness, making them perfect for deviled eggs, egg salad, or slicing into potato salad. This timing ensures you truly make perfect hard boiled eggs for these traditional uses.
Beyond the Stovetop: Exploring Alternative Methods
While the stovetop method is our go-to for its simplicity and reliability, it’s worth noting that there are several other ways to achieve perfectly cooked eggs, especially if you're looking for hands-off convenience or cooking in bulk. Many of these methods also shine at delivering easy-peel results and preventing the dreaded gray yolk.
- Instant Pot: Pressure cooking hard-boiled eggs is incredibly popular. The high-pressure steam often results in eggs that are consistently easy to peel.
- Oven Baking: For a hands-off approach, baking eggs in the oven (often in muffin tins) can yield surprisingly good results.
- Slow Cooker: A slow cooker offers a gentle, low-temperature cooking environment that prevents cracks and rubbery whites.
- Air Fryer: Yes, you can even make hard-boiled eggs in an air fryer! It's a quick and convenient method that often results in easy-to-peel shells.
Each of these methods has its own nuances and benefits, providing excellent alternatives depending on your kitchen setup and preferences. To explore these options further and banish gray yolks forever, be sure to read our guide: No More Gray Yolks: Easy-Peel Hard-Boiled Eggs 5 Ways.
Essential Tips for Easy Peeling and Flawless Results
Beyond timing, a few simple practices can elevate your hard-boiled egg game, ensuring easy peeling and consistently beautiful results:
- Age Matters for Peeling: Older eggs (about a week to 10 days old) are notoriously easier to peel than very fresh eggs. The pH of older eggs changes, making the membrane less likely to stick to the shell. Just be sure they aren't so old they're rotten – perform a quick "float test" (good eggs sink, bad eggs float).
- Room Temperature Eggs: Taking your eggs out of the refrigerator at least 30 minutes before cooking allows them to come to room temperature. This promotes more even cooking and further reduces the risk of cracking when they hit the hot water.
- The Ice Bath is Non-Negotiable: We can't stress this enough. Immediately transferring cooked eggs to an ice bath stops the cooking process dead in its tracks. This not only prevents overcooking but also causes the egg white to contract slightly, pulling away from the shell's membrane, making peeling significantly easier.
- Gentle Peeling: Once chilled, gently tap the egg on a hard surface, then roll it to create tiny cracks all over the shell. Peel under cold running water – the water helps to separate the membrane from the egg.
- Don't Overcrowd the Pot: Cook eggs in a single layer to ensure even cooking and prevent them from bumping into each other and cracking during the boil. If you need to cook a large batch, do it in shifts.
- Salt or Vinegar in Water? Some swear by adding a pinch of salt or a splash of vinegar to the cooking water. While these might help seal a tiny crack if an egg starts to leak, they don't significantly impact peeling or cooking quality. Focus on the cold start and ice bath for best results.
- Proper Storage: Hard-boiled eggs can be stored in the refrigerator for up to 7 days, either peeled or unpeeled. Keeping them in their shells can prolong their freshness slightly.
Conclusion
Achieving the perfect hard-boiled egg, tailored precisely to your preferred yolk consistency, is an essential kitchen skill that's surprisingly easy to master. By understanding the simple science behind the cold water start, the off-heat standing method, and precise timing, you can consistently make perfect hard boiled eggs with vibrant, creamy yolks and easy-to-peel shells. Experiment with the different timings, discover your favorite yolk texture, and enjoy the endless culinary possibilities that this humble yet mighty ingredient offers. Happy boiling!
